


Are you thinking about starting a blog? Welcome to my ultimate guide on blogging for beginners, where you’ll learn (literally) everything you need to know in order to start a successful blog today. Buckle your seat belts because this is going to be a fun ride, my friend!
Blogging can be hugely rewarding. It can make great money—even as we approach 2024 and beyond. (It’s definitely not too late to join the blogging bandwagon!)

I’m guessing you’ve been drawn to blogging because you’ve got friends who blog, and you’d love to join them. Or maybe you read some big-name blogs and you’d love to emulate those bloggers’ success. You might be turning to blogging as a side business to help bring in some extra income—or as a full online business that you hope will replace your day job. You could’ve have tried blogging in the past, but struggled to get traction.
Whatever brought you to blogging here today, the actual process of starting a blog might seem quite daunting.
We’re going to cover everything about blogging for beginners—taking it all step by step.

Along the way, I’ll explain technical blogging terms in plain English, and I’ll share plenty of screenshots to help you see exactly what you need to do to set up your blog.
Before we dive in, one quick tip: this is a detailed and in-depth blogging guide for beginners. While it will only take you 20-30 minutes to actually set up your blog, there’s a lot of advice here that you’ll want to come back to in the days and weeks ahead. Make sure you bookmark this guide so you can easily find it again.
Another ask I have of you is to share this on social media if you find it useful—not only will you be able to go back to that link, time and time again, but you may also get to know some other new bloggers to join alongside your journey.

Blogging for Beginners: Easy Guide, Tips and Mistakes to Avoid (Everything You Need to Know to Start a Successful Blog)
Disclosure: Please note that some of the links below are affiliate links and at no additional cost to you, I’ll earn a commission. Know that I only recommend products and services I’ve personally used and stand behind. When you use one of my affiliate links, the company compensates me, which helps me run this blog and keep my in-depth content free of charge for readers (like you).
Try My Free AI-Powered Blog Idea Generator Tool
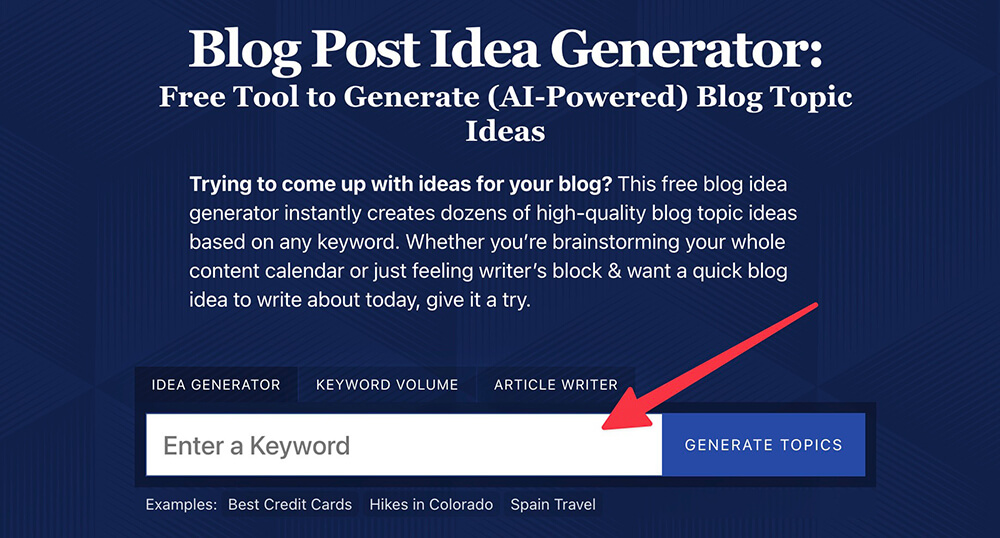
Writer’s block can be a real pain. Trust me, I know. That’s why I built this forever free blog post idea generator tool, powered by AI. In seconds, you can generate endless ideas for your next blog posts.
6 Great Reasons to Start Blogging in 2023 (and Beyond)
There are lots of great reasons to start a blog—and we’re going to run through some of the best here.
1. Creating or Growing a Money-Making Business
Blogging isn’t a “get rich quick” scheme. It can take months or even years to build a successful blog.
But blogging can definitely be a viable business model. There are a couple of different ways to make this work:
- Use a blog to promote an existing business. If you’re already running a business, whether that’s a small side business or a full-time startup with multiple employees, then your blog could be a hugely valuable marketing tool (that costs you very little).
- Create a blog and monetize it. If you don’t already have a business, that’s fine too. Plenty of very successful bloggers started out simply by launching a blog—finding ways to make money from it as they became more experienced.
There are lots of different ways to make money through your blog, and we’ll come to those in Step 7 of this guide. For now, I simply want you to know that if you’re attracted to blogging as a way to make money, then that’s absolutely something you can do.
2. Building Your Personal Brand
Another really good reason to begin blogging is to create a name for yourself. These days, a lot of people do this through social media—think of Instagram influencers—but there are plenty of people who build their brand through a blog instead.
The huge advantage of a blog, here, is that you own your blog. It can’t be suddenly shut down because someone complains on Facebook. By contrast, your following on any social media site could be suddenly taken away if that site bans you … or even if it folds completely.
3. Launching Your Freelancing Career
Blogging can also be a powerful tool for other freelancers, such as freelance designers, photographers, illustrators, developers, and more. You can showcase your work on your blog—and your blog can help bring more clients to your website, too.
Blogging is also a great way to demonstrate your skills, which is ideal if you want to start a career as a freelancer. Obviously, blogging is a great fit for freelance writing (especially content writing), and the pieces you write for your blog could form the start of your freelancing portfolio.
4. Sharing a Message With the World
Is there a particular cause you want to champion or a message that you’d like to share? Blogging lets you publish whatever you want. You don’t need to submit articles to editors or find a book publisher who’ll print your book: you can start sharing your message straight away.
Blogging also makes it easy to reach people around the world. You’re not limited to your city or even your country: readers can, and will, come to your blog from all over the globe.
5. Documenting Your Life
Some people begin blogging as a form of journaling. This is a great motivation, one that’s spurred bloggers on ever since the first blog was created.
Perhaps you want to share your travel adventures, keep a record of your time as a new parent, or simply have fun sharing your daily life with the world. You might write blog content that’s purely aimed at friends and family—or you might turn to lifestyle blogging as a way to center your blog on your own life.
6. As a Creative Outlet
One other reason to blog is simply as an outlet for your writing and creativity. Anything goes, here: you might write personal essays, fiction, or even poetry. You could use your blog as a quick and easy way to experiment with different styles of writing—and, like many bloggers, you may find that having an audience helps keep you motivated.
If you’re a photographer or illustrator, rather than a writer, then you could publish regular blog posts that collate together pieces of your work. You could even try blogging vs vlogging on YouTube, if you enjoy producing creative videos.
Your reason might be a mix of two or more of the reasons above—and that’s fine, too. Or you might have a completely different reason for wanting to blog.
Whatever motivates you, you’ll need to go through the following steps to get your blog up and running.
Step 1. Choose Your Niche (Topic) and Your Blog’s Name
Your blog needs to fit into a niche—a topic area. This could be something very broad like “travel” or “parenting”, though it’s often helpful if you can define it a bit more narrowly.
You could narrow down your niche by focusing on your audience: “traveling after retirement”, for instance, or “parenting kids with special needs”.
You could also narrow your niche by picking a smaller topic within it. For instance, instead of writing about “online gaming” as a whole, you could focus on “web browser games”.
Having a niche is important because it helps you build a readership.
If you just blog about anything and everything that interests you, it’s hard to get readers to stick around. They might read a post or two—but they won’t come back for more, or subscribe to your email list, because they’re only interested in one of the many topics you write about.
If you’re not sure what niche to choose, take a look at my guide to picking a blog niche. It includes 60+ niche ideas and examples to inspire you.
Tip: Want to cover a range of topics related to your interests? A lifestyle blog might be a good fit for you. Here, the “niche” is you—and you’re focused on providing content that interests your audience, often covering a range of related areas like beauty, fashion, travel, and health & wellness.
Your blog’s niche may also influence the name you choose for your blog. There are three main options here:
- Use your own name or a variation of it. A big advantage of this is that it’s easy to adjust your niche—or even change it altogether—in the future. I use a variation of my name as my blog’s name: my name is Ryan Robinson and my blog is RyRob.com.
- Use a keyword that relates to your niche. This used to be considered good practice for SEO, but these days, it’s believed that having a keyword in your domain isn’t necessary. A good example of this type of blog is SmartBlogger.com, which incorporates “Blogger” into the domain name.
- Choose a name that you can turn into a brand. You might decide not to use a keyword at all, but instead choose a word or short phrase that you can develop as a brand (after all, “Amazon” doesn’t have anything to do with rivers and “Apple” doesn’t sell fruit). Moz.com has this kind of name—having developed from its original keyword-focused name, “SEOMoz”.
Whatever name you pick, you’ll need to check that it’s available as a domain name (website address). That’s what we’re going to look at next.
Step 2. Set Up Your Blog With a Domain Name and Web Hosting
All websites need a domain name (like ryrob.com) and web hosting. Here’s a quick tutorial on how to get those set up.
Choosing a Domain Name for Your Blog
You might have heard that it’s possible to get a free domain name. And you can—under some circumstances! But before we get to that, I want to clear up one point where new bloggers sometimes get confused.
Some blogging platforms offer a “free” domain name, but really, your blog becomes part of their domain. For instance, if I ran RyRob as a free WordPress.com blog, then its URL would be something like ryrob.wordpress.com. If I used Shopify instead, it would be ryrob.myshopify.com. In each case, I’d have a subdomain—not a full domain name of my own.
It’s definitely best to have your own domain name if you possibly can: it looks a lot more professional, plus it’s easier for your readers to remember.
So how do you get a domain name? It’s much easier than you might think, as there are lots of companies out there called “domain registrars” that do all the work of registering a domain name for you.
It’s also cheaper than you might expect. A .com domain name will cost you around $15–$20 per year. Other domain names might be available more cheaply, but I’d advise getting a .com if you can: it’s what most readers will expect and it helps make you look reputable.
Tip: The .com domain means “company”. But what if your blog definitely isn’t a company? If you’re blogging for a non-profit or charity, the .org domain extension makes the most sense.
The easiest and cheapest way to get your domain name is to register it through your web host. Both Bluehost and Dreamhost (the top web hosting companies I recommend) will give you a free domain name with a year of web hosting.
To register your free domain name, simply enter it when setting up your web hosting account. If you haven’t decided on your domain name yet, both Bluehost and Dreamhost let you pick a free domain name later instead.
For lots more help on registering a domain name, I’ve got a full guide to the best domain name registrars and a beginner’s guide to choosing a domain name.
Choosing Web Hosting for Your Blog
When you’re a blogging beginner, you might be a little confused about what web hosting is and why you need it.
All websites are “hosted” on the internet. Technically, it would be possible to run a website by having your computer connected to the internet 24/7. However, that would bring up a huge number of problems (like hacking, internet connectivity issues, plus a large electricity bill).
Instead, you get your site online by having it hosted on big computers (servers) belonging to a professional web hosting company. This means that your readers and customers can access your blog at any time of the day or night, from all around the world. Your web host takes care of the technical aspects of hosting a website, like running the right kind of software.
Web hosting varies a lot in costs, as big websites with lots of traffic are more expensive to host than tiny websites with only a few visitors. But in your first few years of blogging, you’re likely to be paying around $35–$100 per year.
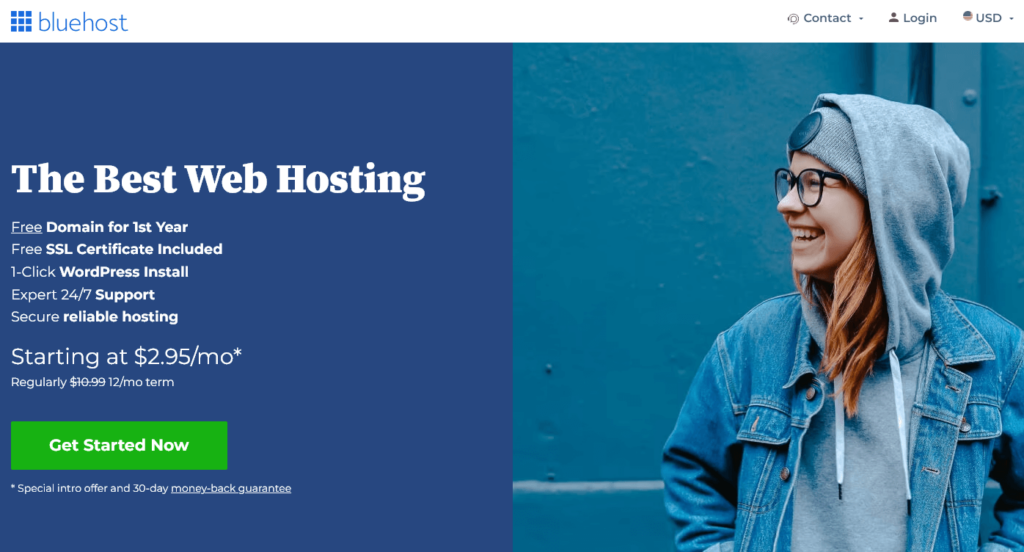
There are lots of different web hosts out there, but for beginners, I strongly recommend that you choose either Bluehost or Dreamhost.
Both Bluehost and Dreamhost provide great-value web hosting that’s powerful enough to run a WordPress blog (WordPress is the most popular blogging software in the world). They’ve also got great customer support and it’s easy to set up your account.
And, as I mentioned above, Bluehost and Dreamhost will both give you a totally free domain name when you set up your hosting account.
If you’re not sure which to pick, here’s my recommendation:
- Bluehost is the simplest to get started with, and their 24/7 customer support is superb. Go with Bluehost if you’re not very confident with technical things.
- Dreamhost works out a bit cheaper and your site’s likely to be a little faster too. Go with Dreamhost if you’re not daunted by the more technical side of blogging.
Let’s take a look at the process of creating a web hosting account with Bluehost. We’ll go through everything step by step. You can simply open up Bluehost in a new tab or window and follow the instructions here to create your web hosting account and install WordPress.
Tip: You don’t have to use the WordPress software for your blog. But I strongly recommend WordPress for beginners and experienced bloggers alike. WordPress is used by 43% of all websites (and its market share has been growing year after year). It’s quite easy to use and it has a huge number of add-ons, called plugins, that you can install to add new features and functionality to your blog. If you want to explore other options, including some free blog platforms, just take a look at my guide to the best blogging platforms.
Creating Your Bluehost Web Hosting Account (Beginner-Friendly Guide)
Here’s how to buy web hosting with Bluehost.
1. Go to the Bluehost website and click the Get Started Now button.
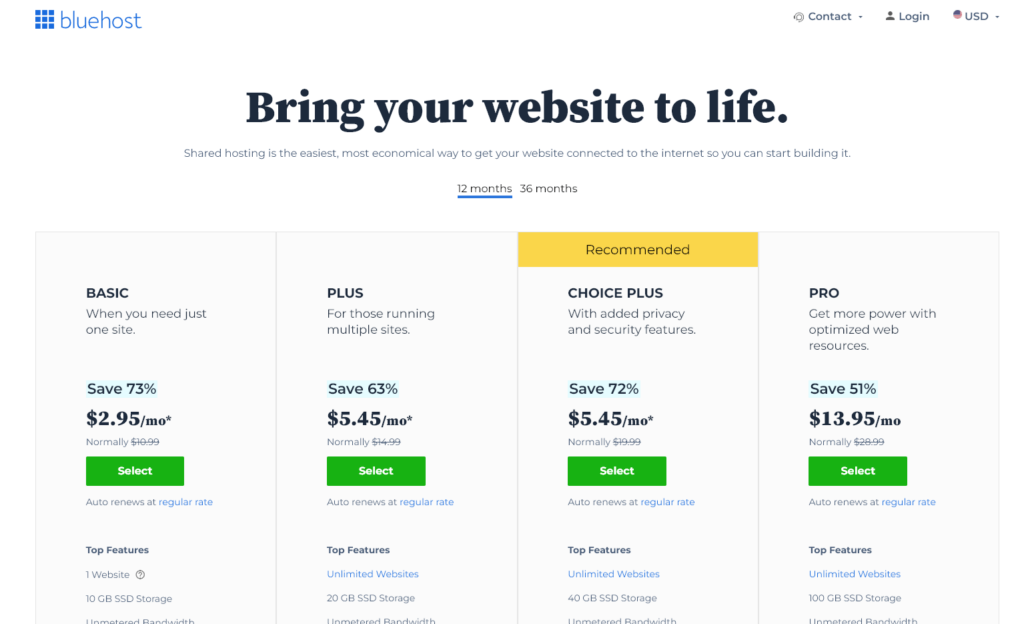
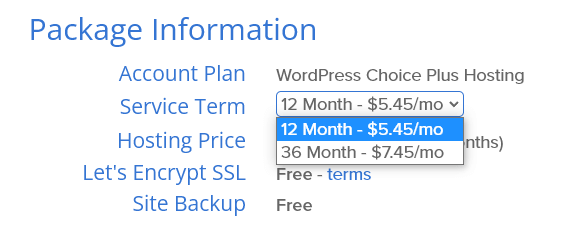
2. Select a hosting plan. The Choice Plus plan is my favorite: it keeps your personal details private and lets you create as many blogs as you want. You can choose any of the three plans, though. Just click the green Select button to pick your plan.
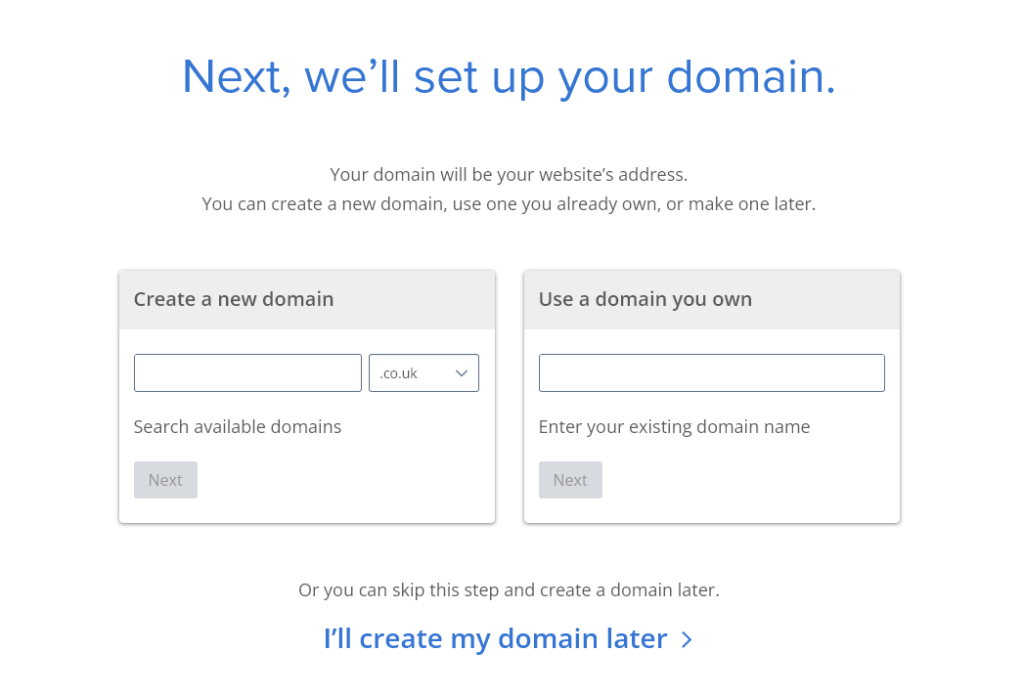
3. Create a new domain name. If you haven’t yet decided on a blog name yet, or if the name you want is already taken, just click the “I’ll create my domain later” link at the bottom of the page. You can add it to your Bluehost account once you’re ready.
4. Fill in your personal details to create your Bluehost account. Bluehost will ask for your name, address, phone number, and email address.

5. Scroll down the page and choose how many months to pay for. The more months you pay for upfront, the cheaper the cost per month.
6. Decide on your package extras. Bluehost will automatically add SiteLock security as an extra. You can uncheck this if you wish, though you should use a security plugin like Sucuri Security to keep your new blog safe.
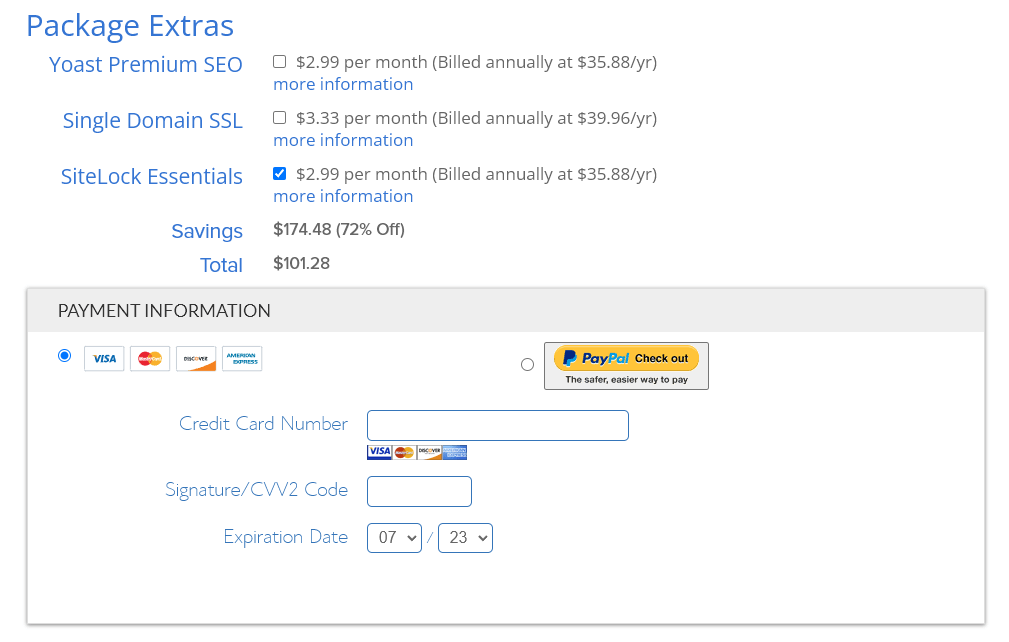
7. Enter your billing details to create your account. You’ll need to check the box to confirm that you’ve read the Terms of Service—after that, go ahead and press Submit.
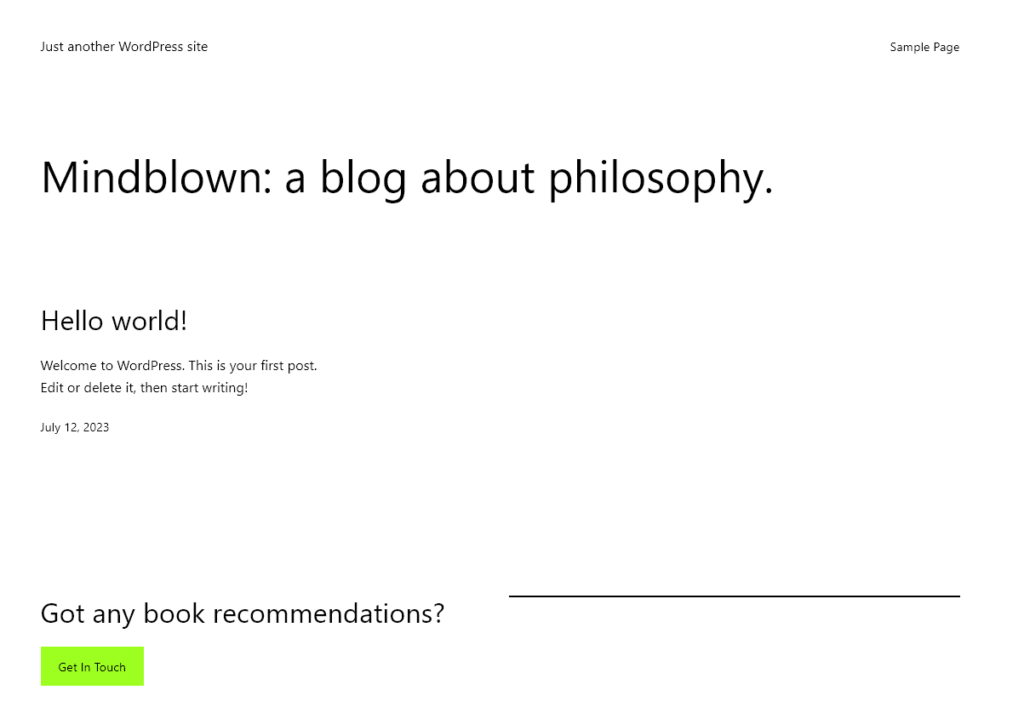
That’s it: your web hosting account is being set up! Bluehost will send you an email almost instantly with your account details. You can use this to log in to your Bluehost account, then you can follow Bluehost’s instructions to install WordPress for your blog site.
Once you’ve installed WordPress, you can go to your domain name in your browser and you should see your blog. It will look something like this:
Tip: If you don’t see your blog yet, don’t worry! It may take a few hours for your new blog to become available worldwide. Just wait a while and try again later.
Step 3. Choose a Theme (Design) For Your Blog
As soon as you install WordPress, your blog will have a default design: we saw that above in the screenshot after setting up Bluehost.
Each year, WordPress releases a new default design. These are named after the year (“Twenty Twenty-Three”, for instance). You can stick with the default if you like, but you’ll probably find that there’s a different design—called a “WordPress theme”—which suits you and your blog a bit better.
The great news is that it’s really easy to change your blog’s theme. You don’t need any design skills and you definitely don’t need to be able to write computer code.
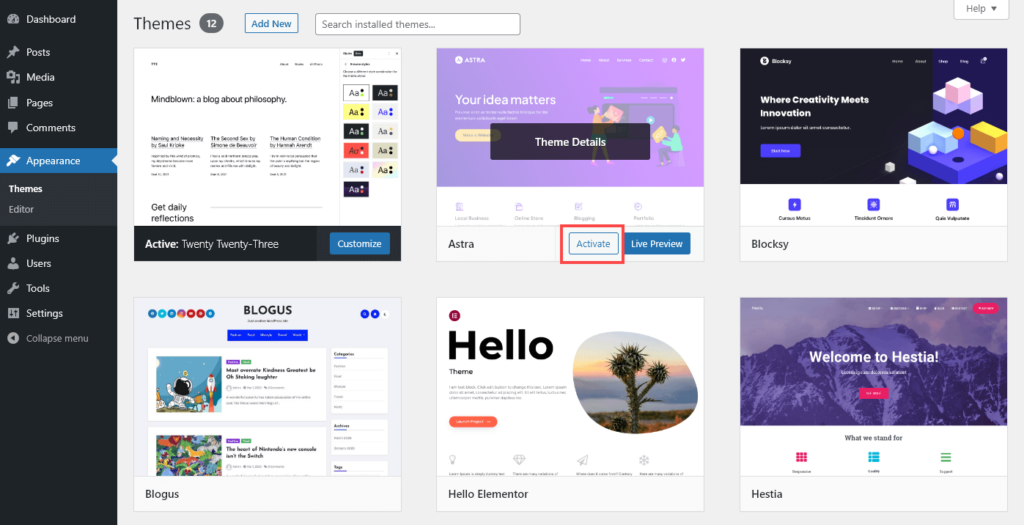
All you need to do is log in to your blog’s admin area. To find this, simply add /wp-admin to the end of your blog’s domain (e.g. ryrob.com/wp-admin). Then, in the left-hand sidebar, go to Appearance→Themes.
Here, you’ll see a list of all the pre-installed themes on your blog. This will include your current theme, on the top right.
To change to a different theme, simply run your mouse cursor over it, then click the ‘Activate’ button. Here’s how that looks:
So how do you choose the best theme for your blog?
You’ll want to think about your brand and how you’d like your site to look. Some WordPress themes are perfect for personal, journal-style blogs, others are great for professional business, and some are designed with special features in mind, like an online shop.
I’ve handpicked my favorite WordPress themes, so take a look through that list to see if there’s a theme that you love the look of.
Tip: You can change your WordPress theme as often as you like. (I wouldn’t recommend doing so too frequently once your blog is well established, as it might confuse your readers.) When you change your theme, all your content stays the same. The text and images you’ve added to your posts, pages, and sidebar will all still be there. It’s just the layout and design that changes.
Adding More Themes to Your Blog
What if you want more options than the pre-installed themes on your blog? Perhaps a friend or fellow blogger has recommended a theme that you’d love to use. If so, just go to Appearance→Themes, click ‘Add New’ and type in the name of a theme to search for it.
My top theme recommendations are Kadence WP, Hello Elementor, and Astra. They’re all free to get started with, but they all offer a paid plan that you can upgrade to in the future to get extra features.
After installing and activating your theme, you can check out how your blog looks simply by going to your blog’s URL. Your changes will be made live straight away.
Tip: You can usually make some edits to your blog’s design under Appearance → Customize. The exact options you have here will depend on your theme, but you can normally expect to be able to change your fonts, font sizes, colors, header image (the image that appears at the very top of each page), and more.
Step 4. Write an About Page for Your Blog
In WordPress, you can create both “pages” and “posts” for your blog.
So what’s the difference between these? Well, both pages and posts are types of webpage. But they’re used for different purposes in WordPress.
“Pages” are static pages that stay relevant over time. They aren’t dated like posts. You might have an About page, a Contact page, a Privacy Policy page, and so on. Most of your pages will likely appear in your site’s navigation menu. You might occasionally update them, but they’ll basically stay the same.
“Posts” are your blog posts. These have a date and a category. You might update your blog posts over time—but you probably won’t link to them in your navigation menu. By the time you’ve been blogging for a few months, you’ll have many more blog posts than pages. Your posts will appear either on the front page of your site or on your blog’s index (if you prefer to have a static front page).
One of the most important pages to create for your blog is your About page. If someone arrives at a post, through a search engine or social media, they might read the post then go straight to your About page to learn more about your blog—and about you.
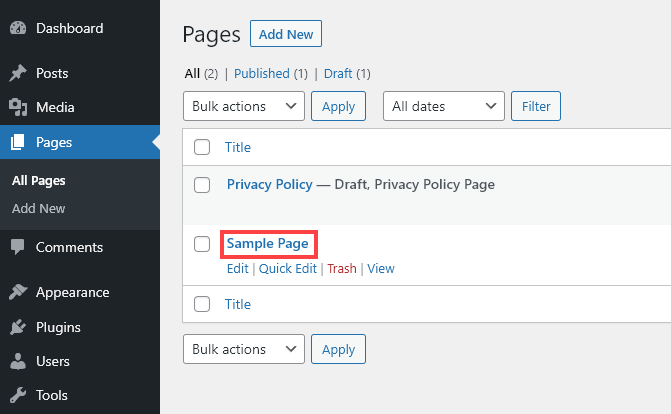
When you installed WordPress on your site, WordPress automatically created a sample page for you. It’s easy to edit this and turn it into your About page.
First, click on the Pages link on the left-hand side of your WordPress admin area.
Then, click on the title (“Sample Page”) to edit the page.
You’ll be taken straight into the WordPress editor. Because you’re using it for the first time, you’ll see a popup with some tips. You can read through these if you want to, or you can simply close the popup.
You can change the title and type in whatever text you want for the page itself. The WordPress block editor lets you easily add images and other types of multimedia.
It’s a good idea to include:
- Information about your blog itself: what topics you cover, who your blog is for, maybe how often you post.
- A few links to your most popular posts. (Some blogs will also have a “Start Here” page that includes more links.)
- Some brief information about you, the blogger. You don’t need to go into lots of detail here: just share a few interesting facts. It’s a great idea to include any credentials, qualifications, or experience you have that relate to your blog’s topic. It’s good to include a photo of yourself if you’re willing to do so.
Tip: Some bloggers want to remain anonymous or semi-anonymous. This could be a personal preference, or it could be because they don’t want their workplace (or certain people in their life) to connect them with the blog. You could blog under a pen name, you could use only your first name, you could pick a variation of your name, and you can avoid using a photo of your face on your blog.
In the right-hand panel, under the “Page” tab, you’ll also want to change the URL for the page. This is the page’s web address on your website. Just click on the URL to change it.
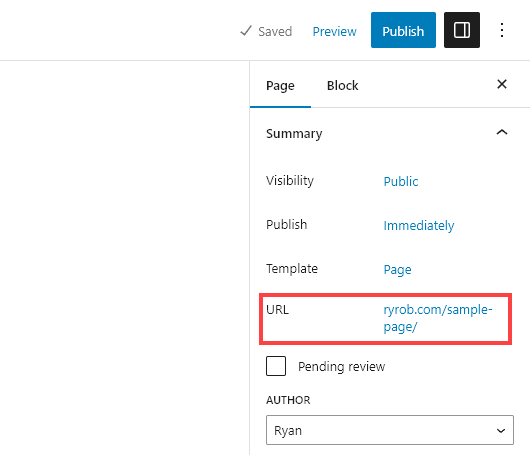
I’d recommend using about for this, so that your page URL will be something like ryrob.com/about.
Once you’re happy with your page, go ahead and click the Update button at the top of the screen.
Step 5. Write Your First Blog Post (Blogging Tips)
Writing your very first blog post can be a little daunting. But you can save it as a draft while you’re working on it—you don’t have to publish your post until you’re ready.
To begin with, you’ll want to come up with an idea that relates to your blog’s niche. You might already have lots of ideas in mind that you want to blog about—but if not, check out my list of blog post ideas to help inspire you and use my free blog idea generator tool.
Next, you’ll want to plan your blog post and think how best to structure it. There are lots of different potential structures you can use to put together a blog post. A couple of really popular ones are a “how to” post, teaching people how to do something, and a “list” post, bringing together a list of related ideas, tips, or resources.
For lots of other blog post structures, check out these 10 blog post templates. You’ll also want to do some keyword research to find the best topics to write about for your target audience (use my free keyword research tool for that).
To create a new blog post, go to Posts→Add New in your WordPress admin area.
You’ll see the WordPress editor that you already saw when updating your About page: it’s the same editor for posts as for pages.
First, click on “Add title” and enter a title for your post.
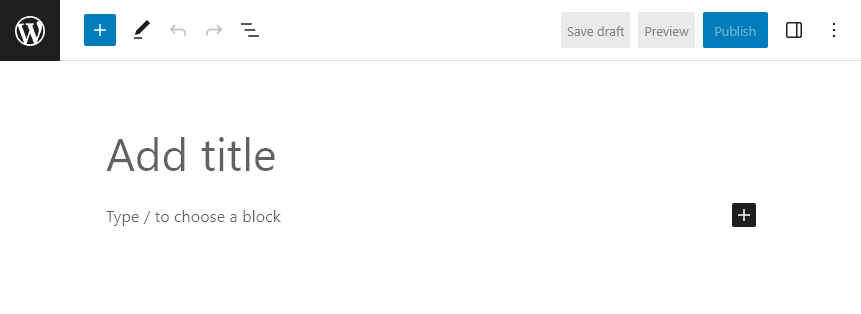
Then, you can start writing your post where it says “Start writing or type / to choose a block.” Just write as you normally would in Word or Google Docs: when you hit Enter, WordPress will automatically create a new paragraph block for you.
Tip: If you want, you can experiment with other types of blocks. You might want to add a list or image block, for instance.
For help writing your post itself, take a look at my ultimate guide to writing blog posts. My advice there is aimed at money-making bloggers, but you’ll hopefully also find it a useful read if you’re writing a more personal or creative blog.
To format your text within a block, use the little toolbar that appears when you click on your block. Here’s how it looks for a paragraph block:
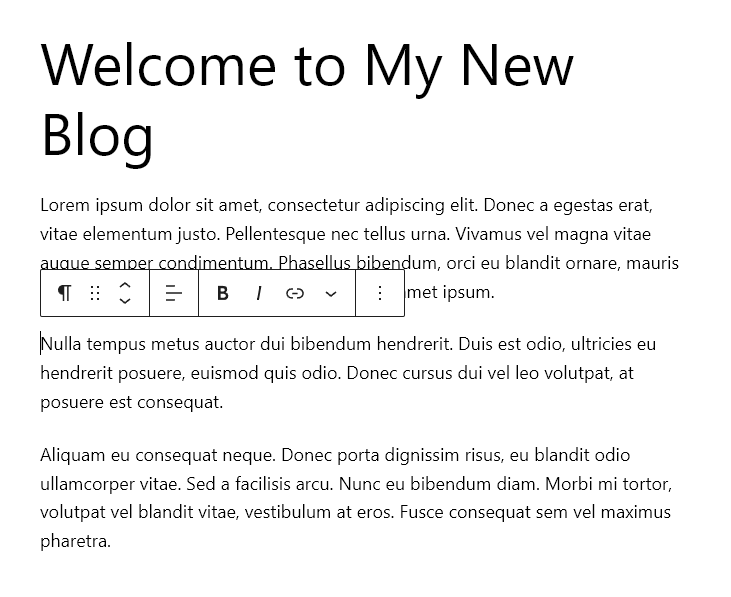
At the start of that toolbar, you’ll see a backward P. That tells you that this is a paragraph block. If you want a different type of block, just click on the backward P and choose something else. For instance, you might want to create a heading (subheading) in your post, or you could change your paragraph to a list.
There are dozens of different types of blocks you can choose from when writing a post or page. To see all the different ones, click on the + symbol on the right-hand side of your screen. The blocks are divided into different areas here: scroll up and down to see more, and just click on any block you want to add it into your post.

Tip: It’s a great idea to add an image at the start or near the start of your post to help draw the reader in. You can use Pixabay and Pexels to get free images that are licensed for use on your blog, or you can purchase stock images from sites like iStockPhoto or Shutterstock.
Publish Your First Post
You can spend as long as you like working on your blog post—just use the “Save draft” link on the top right to save it as you go along.
Once you’re ready to publish your post, go ahead and Publish your post, using the button on the top right.
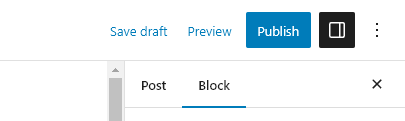
If you want, you can also Preview your post before publishing it. This will open up a preview of your post in a new tab, showing you exactly how it will look once it’s live on your blog.
Deleting the Default Blog Post
When you installed WordPress, it automatically created and published a “Hello world!” example post. It’s best to delete this, as it looks a bit amateur to leave it up on your blog.
Just go to Posts→All Posts in your WordPress admin area, run your mouse cursor over the post’s title, then click on the red Trash link to delete it.
Step 6. Bring Readers to Your Blog
Now that you’ve published your About page and your first blog post, it’s time to start thinking about how to bring readers to your blog.
Tip: You might want to publish a couple of other blog posts before you start encouraging readers to visit your blog. This gives people plenty to read when they first arrive.
When you’re just getting started as a new blogger, one of the simplest ways to get readers is to let your family and friends know about your blog. You could send out an email or put up a post on social media. You don’t need to give lots of information: just the URL of your blog and a sentence or two explaining what you blog about.
Hopefully, that will start bringing a few new visitors to your blog—and you might even find that some of your friends share your new blog with their friends, bringing in more readers.
Next, start finding readers who aren’t already connected to you. That means figuring out where your ideal readers hang out online. Some good places to begin are:
Online Groups and Forums Related to Your Niche
Whatever niche you’re in, there are bound to be online groups and forums related to it. Think Facebook groups, LinkedIn groups, web-based forums on standalone websites, communities on Reddit, and so on.
Join several different, large groups, and spend a bit of time reading posts there. Are other people sharing their blog posts? If so, feel free to share one of your posts too. On forums, you could also put the link to your blog in your signature, if that’s allowed: that way, it’ll show up on every post you write.
If the group discourages or forbids people from advertising their blog, you could still find readers in that group. Look out for questions you can answer that relate to topics you blog about and, where relevant, include a link to a post on your blog where people can get more information.
Answering Questions on Quora
Another great place to answer questions is on Quora. This huge questions-and-answers website can drive a lot of traffic (web visitors) to your blog.
You’ll need to look for questions that are highly relevant to your blog’s topic, and write a full and thorough answer. Don’t just write a couple of sentences and link to your blog post. You want an answer that will be upvoted to become the top answer for that question, giving it lots of visibility.
Quora can also be a great source of ideas for your blog. My post on driving traffic to your website grew out of a (very popular) answer I wrote on Quora to the question “I’ve started a blog. How can I increase blog traffic?”
Guest Posting on Other Blogs in Your Niche
Another great way to find your readers is to look at the blogs in your niche that already have an established audience. If you’re writing on similar topics, at least some of those readers will come and check out what you have to say.
A guest post is a (usually free) piece of content that you write for another blog. In return for that content, you get a “bio” at the end of the post where you can link to your blog or, even better, to a great post on your blog that relates to the topic of your guest post.
Readers who’ve enjoyed your guest post may well click on your link to read more from you—bringing them to your own blog. Plus, the host blogger will hopefully have a great experience working with you, potentially opening up opportunities for further collaborations in the future.
Improving your Search Engine Optimization (SEO)
When you first launch your blog, your readers are likely to come through social media posts and guest posts or links from other blogs. As time goes by and your blog goes, it’ll become easier to find through search engines. (Simply writing more posts helps a lot here, as the more posts you have, the more chances you have for someone to find you through an online search.)
Search engine optimization (often shortened to SEO) means doing the things that help your blog, and individual posts on your blog, to come higher in search engine results. The position your blog or a post on your blog comes in is called its “rank” on a search engine.
SEO is a huge area that you could spend years studying—but the basics are easy to get to grips with. To get started, check out my guide to blog SEO strategies and my tips for on-page SEO (“on-page” means all the things you do with your blog post itself to help it rank well, such as having a clear and descriptive title).
You’ll also want to install a good SEO plugin on your blog so you can easily make changes that improve your SEO. I recommend Yoast SEO, which is second on my list of top WordPress plugins. These are some of the very best blogging tools for beginners.
It’s a good idea to sign up for a Google Analytics account, too, so you can see exactly which posts are bringing in the most traffic, and where visitors are going on your blog.
Step 7. Start Making Money From Your Blog
Not all bloggers want to make money. As we saw earlier in this guide, there are lots of great reasons to blog that either aren’t money-related at all, or involve using your blog quite indirectly to make money (e.g. to build up your profile in your field so you can land a better job).
However, many bloggers do want to make money. Even if they don’t plan to make a living from their blog, they may want to at least make enough to compensate them for their time spent blogging. Plenty of bloggers also need their blog to bring in at least a little bit of money to cover the costs of web hosting, along with any premium WordPress themes or plugins.
So how can you start making money from your blog? There are lots of different methods that bloggers use: I’ll take you through some of the most popular and successful ones.
Running Advertisements on Your Blog
Lots of beginner bloggers think about advertising when they start wondering how to make money from their blog. And that makes sense: you’ve probably seen plenty of adverts on other blogs and websites, in YouTube videos, on social media, and so on. Advertising is everywhere. There are also lots of blog advertising networks (such as Adsense) that make it really easy to start monetizing your blog.
So could blog ads make money for you?
Unfortunately, for most blogging beginners, advertising isn’t a good way to bring in money. You need a very large audience to make any significant amount of money through advertising.
A big drawback to advertising, too, is that it tends to drive readers away from your blog. When you’re starting out, getting a handful of dollars (at best) per month but losing readers probably isn’t worth it.
Is it ever appropriate for brand new blogs to run ads? Yes: if you’re planning to monetize with ads as your blog grows, then it may well make sense to put ads in place early on. That way, you won’t get pushback from an established readership by introducing ads after months or years of growing your blog.
Publishing Sponsored Posts on Your Blog
Another popular way to make money through your blog is to publish sponsored posts. These are posts from companies and brands that want to advertise their product or service on your blog.
The company sponsoring the post will normally write it for you, at no charge, but if you prefer, most companies will also be happy for you to write the post yourself.
Sponsored posts are particularly popular in certain niches, including the travel, parenting, relationships, health, and beauty niches. However, blogs across lots of different niches publish sponsored posts, so they’re worth experimenting with even outside those niches.
For the company, one big benefit of writing a sponsored post is that they’ll get a link back to their service/product. You should ideally “nofollow” this link: this won’t pass the same SEO benefits to the sponsoring company, but it will avoid you risking a Google penalty. Keep in mind that companies may not pay so much for a sponsored post with a nofollow link, though.
Marketing Affiliate Products or Services Through Your Blog
One of my favorite ways to make money blogging is through affiliate marketing. Affiliate marketing means becoming an “affiliate” for another company. You get a special link to use when recommending and linking to their products/services. If someone buys from them after going through your special link, then you get some commission.
Affiliate commission rates can vary wildly. On many digital products, such as online courses, affiliates get 50% of the sales price. With Amazon products, the standard affiliate commission is 5%. Here are my picks for all the best affiliate programs for bloggers this year.
You can create a range of types of content to promote affiliate products or services, such as case studies, reviews, step-by-step guides, or even podcast episodes where you talk about your favorite products/services (use your affiliate link in the show notes). You could also use email marketing to promote affiliate offers to your email list.
Selling a Digital Product That You’ve Created
Another great way to make money from your blog is to create and sell a digital product. This does take time upfront—but it can provide income for months or years to come, with very little additional work on your part. Take for example, my course: Built to Blog.
Digital products usually have very low overheads (it doesn’t cost you much at all to supply them), so you can easily scale up your business.
Some great digital products to consider are:
- Ebooks of specialist information relating to your niche. You can sell ebooks through sites like Amazon, but if you want to sell a high-priced, specialist ebook, then you’ll likely make a lot more profit selling it through your website.
- Printables that customers can download and print on their home printer. These could include craft, knitting, or sewing patterns, planner pages, motivational quotes or posters, or pretty much anything that people might want to buy and print.
- A simple app or piece of software. If you’re good at coding (or can partner up with someone who is), this could be a great product to sell—especially if you can spot a gap in the market for a useful tool that your readers would love.
- Website themes or templates. If you’re good at design, you could create and sell WordPress themes or other website templates. There’s a huge market for these, but also a lot of competition, so you’ll want to find a way to make yours stand out.
- Art, photography, or music. Do you have a creative side? You could sell digital art, stock photography, music clips or sound effects—or even digital downloads of songs you’ve written and recorded.
Running an Online Course Related to Your Blog’s Niche
Plenty of bloggers sell online blogging courses or classes—and these can bring in quite large sums. An in-depth online course could sell for hundreds of dollars: for instance, my Built to Blog course sells for $497.
Online courses can take quite a bit of time to create, and you may need to invest in equipment like a good camera and mic to record your course. This means they’re not usually the best monetization method for absolute beginners.
It’s a good idea to have the possibility of an online course in mind when you’re just getting started, though. You could start gathering ideas and testing out topics that you might cover in a course through blog posts and email newsletters.
Providing a Service to Clients Who Find You Through Your Blog
One really quick way to monetize that many beginner bloggers don’t consider is selling services. Even if this isn’t the business model you want to follow long-term, it can still provide a much-needed boost to your funds when you’re getting started with blogging.
You could offer all sorts of services. Some of the most common ones offered by bloggers are:
- Freelance writing—including content writing and copywriting.
- Social media management—writing, monitoring, and replying to posts on social platforms.
- Design—which could be for logos, marketing materials, or even whole websites.
- Photography—you might specialize in a certain type of photography, like family photography, newborn photography, or wedding photography.
These are far from the only ways to make money with a blog: there are lots of other options you might want to consider too. Take a look at my list of ways to make money online for some great ideas.
Your Blogging Glossary: 10 Important Terms for Beginner Bloggers to Know
One question that always crops up when I cover blogging for beginners is “what does that word mean?” When you first get into blogging, it can seem like there are lots of strange blogging terms that no one ever fully explains.
Here, I’ve brought together an alphabetical list of some of the most common WordPress and blogging-related terms that you’re likely to encounter in your early days of blogging.
Admin Area
The WordPress admin area is the “backend” of your blog. You can only see this when you’re logged in to WordPress: your readers won’t ever see it. Your admin area is where you write posts and pages, add plugins, change themes, and control everything on your blog.
You can access your blog’s admin area by going to www.yourblogname.com/wp-admin.
Category
Every blog post you write will have a category. This helps divide your blog into logical sections, making it easy for readers to find the posts that most interest them.
Posts can also have tags, which can potentially help with SEO. Posts can have multiple tags, but you should normally only put each post into one category.
Domain Name
Your website’s domain name is its address on the web. Mine is ryrob.com. The final part of the domain (the .com, .net, .org, etc) is called the top-level domain (TLD) or, more commonly, the domain extension.
Link
A link, or hyperlink, is the clickable text that takes you from one webpage to another. Links can be:
- Internal links: links that go to other pages on the same website.
- External links: links that go to pages on other websites.
- Do-follow links: normal links that Google “follows” and counts as votes for a website.
- No-follow links: links with a special “no-follow” tag that Google can still see but that won’t get counted in the same way toward a website’s ranking.
- Anchor link: also called a “jump link”, this type of link goes to a specific place on a webpage. You could use them to create a table of contents that lets readers jump to different points in a long post.
Menu
Also called a “navigation menu” or just “navigation”, the menu normally runs along the top or side of a website. On mobile devices, it can be opened by tapping the “hamburger” button.
Plugin
In WordPress, a plugin is a special piece of software that adds new functionality to your website. You can download free plugins within your WordPress admin area—and you can find all free plugins listed in the plugin directory on the WordPress website.
Premium plugins are also available. You’ll need to buy a license for these, download the plugin, and upload it as a .zip file under Plugins → Add New in your WordPress admin area.
SEO
SEO stands for “search engine optimization”. It’s the process of optimizing your website to rank well in search engines (primarily Google, as Google has by far the biggest market share of search traffic).
SEO is usually divided into four areas:
- On-page SEO: this includes everything you do on your blog post or page itself to make it rank well, such as using keywords in your headings and subheadings.
- Off-page SEO: this is primarily about getting links to your blog from other blogs and websites. Links are like votes for your site in Google’s eyes, and they help your site to rank better in search engine results.
- Technical SEO: this involves things like speeding up your website and making sure that it’s mobile-friendly.
- Local SEO: this is for local businesses (like restaurants, salons, etc) that will appear on a map in local searches.
WordPress Theme
All WordPress sites have a theme—even if that’s just the default one. The theme controls how the site looks (particularly your homepage) and can also affect how it functions: for instance, some themes will have a dropdown menu or built-in options like contact forms.
You can change your WordPress theme at any time. This won’t change your content (text, images, and videos) but could dramatically change how your site looks. Themes can be free, premium, or custom-made.
Web Hosting
All websites, including all blogs, need some kind of web hosting. A web host will keep your blog online 24/7, providing the right hardware software to run WordPress and other essentials for your blog. When you start blogging, web hosting is likely to be your biggest expense.
WordPress Blogging Platform
WordPress is open-source software for creating a blog or website. “Open-source” means that anyone can use, change, and distribute the software. There are lots of developers who contribute to WordPress’s core code for free. WordPress is free for you to use.
There’s also a commercial version of WordPress called WordPress.com. This is based on the main WordPress software, but also includes web hosting. It can be a good option if you want to create a personal blog, but it doesn’t offer the same flexibility as the regular (WordPress.org) software for business purposes.
Get Started With Blogging for Beginners and Launch Your Blog Today
Blogging can feel like a steep learning curve when you’re a beginner. It might seem like there are lots of different steps to take and things to figure out.
Being a beginner blogger is also really exciting. You’ll be learning new things all the time and you’ll be filled with ideas and a sense of possibilities for your blog. Yes, it can be hard work to build your blog from scratch … but hopefully you’ll have a lot of fun along the way.
I’d recommend setting aside 10–15 minutes each day, or a longer session of 1–2 hours once per week, and you’ll soon have your blog up and running with plenty of great content. You’ll be bringing in new readers in no time at all.
If you get stuck at any point, or something doesn’t seem to be working, take a look at my list of common blogging mistakes (plus fixes for them). You can also use the site search, up in the top right corner of every page on RyRob.com, to search for any blogging topic you’d like to know more about.
Ready to Start Your Blog Today?
Check out my ultimate guide How to Start a Blog (on the Side) that’s been featured on Forbes, Inc and Entrepreneur.


